IGEM Notebook
Contents
Wednesday, June 3, 2009
Romina Clemente and I are trying to find suitable reporter proteins to use. Yesterday, Leland Taylor and Alyndria Thompson were working on ways to insert the gene sequences into the plasmid. Upon seeing how they wanted to manipulated the reporter gene to include the logical clauses, we came up with a few criteria for the reporter genes we would use. The following criteria for genes are listed in order of the broadest aspect to look at to the narrowest aspect:
   a) Doesn't contain restriction sites for the 4 restriction enzymes (EcoR1, Xbal, Spel, Pst1) used to cleave the Biobrick part out of the plasmid.
   b)  Contains 6 cutter restriction sites.
   c) These restriction enzymes aren't blunt (cleave straight down at one spot).
   d) These restriction sites are close to thge 5' (beginning) end of the sequence.
   e) These enzymes are easiest to work with and cheapest.
We are finding the part numbers of the reporter genes we want to use (antibiotic resistance, fluorescence, LacZ) through our own GCAT because we know these ones work. We are then locating these parts on the parts registry [1] website. We copied and pasted the gene sequences we obtained from the registry onto the ApE software [2]. From here, we were able to generate a genetic map of each gene that outlined each restriction site that fit our criteria. We put each genetic map, alongside the part number used, into a Word document.
http://gcat.davidson.edu/GcatWiki/images/0/0e/Restriction_Site_Mapping_on_Reporter_Genes.doc
Later on in the day, we decided that the best way to test for suppression would involve placing the 5mers at the beginning of the reporter gene instead of inserting them into the reporter gene. To do this, we decided that the gene along with its start codon need to be expressed after the 5mer. We will insert a BioBrick plasmid with a 5mer and start codon that will be incorporated before the gene:
RBS-6-8nt-ATG-5mer--ATG-gene
Leland Taylor assembled the oligos that we will need for the BioBrick pieces.
In order to test whether the reporter protein would be expressed regardless of the 5mer being suppressed or not, we would need to remove the suppressor tRNAs from the cell.
Meanwhile, I helped figure out the coding sequence that we will need for the suppressor tRNAs that will bind to the 5mers. We decided that we would be using the following suppressor tRNAs on the Davidson side: CUAGU, CCCUC, CGGUC, CCAUC, and CCACU. We searched through several papers, with little result and finally emailed Dr. Christopher Anderson of UC Berkeley to request the DNA sequence. He emailed us back with a generic DNA code that we could use to create the tRNA; however, for each suppressor tRNA we would use, we would need to change base pairs in the anticodon loop.
The length of the tRNA is 92 nt. The anticodon loop is comprised of 9 nt. Once we have BioBricked the DNA sequence with 4 restriction sites and supplemental nucleotides, the length of the entire gene is 144 nucleotides. This is made up of the 92 nt +22 nt on each side of the sequence (44) + 4 nt on each side of the restriction ends (8).
At the end of the day, we decided to use tetracycline resistance and RFP as our reporter proteins for this tester experiment.
Thursday, June 4, 2009
This morning, I began the day by learning how to use the PERL prgram. Olivia Ho-Shing sat with me and walked me through the program script. And then, Leland Taylor and Shashank Suresh had a problem they wanted us to solve. Leland explained that we need to make sure there is a stop codon in the gene if we fail to suppress the 5mer. The stop codon needs to be before we find another 5mer. They also wanted us to run through both the RFP and Tet Resistance genes to make sure that they did not contain any of the anticodon sequences from our 5 frameshift suppressor tRNAs so as to throw the translation out of frame. They further wanted us to confirm that if we do have successful suppression, there are no stop codons in the middle of the RFP and Tet Resistance genes. PERL did not find any matches for the suppressor tRNAs within genes. We found 3 matches for stop codons UAA. Two of these occured at the end of the Tet and one at the end of RFP, where they should normally be to end translation into a protein.
Following this, Olivia Ho-Shing and I tried to determine how we can add BioBrick ends to our single stranded DNA sequences that code for the suppressor tRNAs. Our ultimate goal is to find complements for these single strands so they can be put into plasmids. We found the standard prefixes and suffixes for sequences that do not contain ATG (becuase this sequence is a functional RNA and will not be translated) and we placed these before and after the altered 92bp sequence that Dr. Anderson provided us with. The prefixes and suffixes are necessary because they are the extra nucleotides that will be mimicking a "restriction enzyme cutting site". The single strand appeared as below after the Bio Brick prefixes and suffixes were added:
22ntPREFIX--32nt--VARIABLE ANTICODON LOOP--51nt--21ntSUFFIX
We used the suppressor codon CUAGU as our example and placed its appropriate anticodon loop in the sequence. We put this into the lancelator that would give us the other strand as well as the oligos we would need for ideal construction of this double stranded DNA fragment to put into the plasmid. We recieved a total of 4 oligos, 2 of which were variable and 2 of which were constant for all 6 different suppressor tRNAs. Using this double strand, we simulated a restriction enzyme digestion by EcoRI and PstI. We took off the G at both ends of the top strand and then removed the first five nucleotides on each end of the bottom strand. This made the top strand longer than the bottom one. We then proceeded to take the two variable strands and changed the anticodon loop nt for each suppressor tRNA we used.
Around lunchtime, we encountered a problem with the BioBrick scar in the "ATG-5mer subpiece" of the test project. It turns out that after annealing the sticky ends of the Xba1 and Spe1 sites, the scar created had a stop codon TAG (UAG) that was in frame with the suppressed codon. When the Xba1 site on insert anneals to the Spe1 site on the plasmid (the green portions), we get a scar that reads TACTAG.
For the afternoon, Olivia Ho-Shing and I finished assembly of the oligos of the suppressor tRNA codes. We assembled the document below:
http://gcat.davidson.edu/GcatWiki/images/5/5e/TRNAoligostoOrder.doc
We were assigned tasks of creating "cartoons" to illustrate the phenomenon that had occurred. No one could successfully do this however, because we could not understand how the piece had formed. The parts registry website provided wrong information on the restriction site of Spe1 which slowed our efficiency. This project turned into an effort to try to find two other different restriction enzymes that have complementary sticky ends other than Xba1 and Spe1. We want to get rid oc the scar that contains TACTAG.
We ended up deciding that a hybrid of two ideas was needed: restriction enzymes would need to be used to make several reporter gene sequences with different beginnings dependending on the suppressor tRNA sequence needed.
Friday, June 5, 2009
Our goal for this morning was to discuss the hybrid PCR approach to assemble the part that comes before the gene we wanted to express. We decided that we would have a BioBrick prefix and a 5mer followed by a sequence of nucleotides whose identity was up to us. Using PCR we would get the second double strand if we have the following:
BioBrick Prefix--ATG--5mer--gene until we get to restriction site
The PCR primer would attach to the ATG and the 5mer and would replicate the complementary base pairs to make a double stranded DNA sequence. As several of us were confused about PCR methods, we looked at the online link provided by Alyndria Thompson's link to the PCR interactive website which was very helpful. We also did some research to discover that the restriction enzyme BseRI (which is contained in the YFP that we wanted to alter) is not compatible with any other restriction enzyme. This is good because we did not want to plasmid containing this gene to close up with Xba1 once we digested it.
The team experienced some confusion with the hybrid idea and spoke to Clif Davis of Missouri Western University on the phone. He told us that there will be one part that is a fragment of the beginning of some nucleotides as a restriction cleaving site, ATG, the logical clause, and the start of the YFP gene that will be placed into a plasmid containing a space. To the left of the space will be the BioBrick Prefix and the right of the space will contain the rest of the genes in the YFP. Therefore, we decided not to alter any BioBrick ends and just look at restriction sites at the beginning of reporter proteins. The small fragment that will be placed into the plasmid will be made by PCR. The PCR will attach a primer onto the ATG and 5mer and replicate.
While we were discussing this, we expanded upon the idea that we can do whatever we want with the "suffix" portion between the 5mer and the beginning of YFP. We decided it would be best to remove ATG and add the first 5 amino acids and the restriction enzyme site. Along with this, if we have the 5mer coding for a certain amino acid (ie methionine) we could replace another codon that codes for methionine WITH that 5mer so long as this codon is contained within the first 15 nt. This way, we would not be altering the protein.
Olivia Ho-Shing came up with an idea of cascading PCR effect for longer logical clauses. Post translational modification of the protein was another one of her ideas. This applies because although we may code for the protein in a given way, the protein may modify or fix itself up to perform a slightly different function in its tertiary form.
Dr. Campbell suggested that we can look up restriction enzymes 400-500 base pairs into the reporter protein we would like to use; however, we have more flexibility in our procedure if we choose more "hardy" cutters. So instead, we could cut with EcoRI instead of with Xba1.
During the afternoon, we set about three tasks: 1) Which primers to use 2) Which promoters to use 3) Which restriction enzymes and how they will determine use of reporter proteins
Olivia Ho-Shing and I began looking up which restriction enzymes were strong so we could base our reporters on that. We began with Tet and RFP since those were the two reporters we had started out with choosing. I found a website that provided enzyme cleavage efficiency based upon the proximity of the site to the end of the PCR fragment that contains it. We discovered the following based upon the attached documents:
http://gcat.davidson.edu/GcatWiki/images/8/8f/Restriction_Enzyme_Cleavage_Efficiency.doc http://gcat.davidson.edu/GcatWiki/images/9/9a/07Jun09_RE_Cutting_Efficiency_oh.doc
We decided that these two reporters contained efficient enzymes in a good quantity to choose from. On Monday, we will look through these enzymes once more and finalize which enzymes we would like to use with RFP and Tet.
Sunday, June 7, 2009
We did preparations for the mini prep this evening. The following notes are courtesy of Olivia Ho-Shing.
1. Sterically transfer ~2mL LB+AMP (AMP are ampicillin resistant plasmids) *Never put fluid back into bottle once it has entered pipette* 2. Use forceps to grab toothpick, scrap some frozen cells, rub in tube with top
Tubes
S03511 (2)
K091111
B0030
I715039
K091112
I715039
J31007 (2)
B0034
E1010
S03710
Monday, June 8, 2009
We reviewed the PCR process this morning as well as the restriction enzyme cleavage process.
Then, Leland Taylor, Olivia Ho-Shing and I all worked on converting the tRNA oligos we made to the template that Missouri Western used. The oligos we had previously made were different from the ones that Dr. Anderson had originally emailed us because further communication between Dr. Anderson and Missouri Western resulted in a better template.
We tried several times to minimize the number of oligos while keeping their individual lengths under 80bp. We managed to do this in the end by creating 7 oligos, 2 of which are variable between the suppressor tRNAs. We reviewed the following document and finalized the oligos that we needed to order for the frameshift suppressor tRNAs. We decided to keep both the 10bp and 9bp anticodons of CCAUC.
I also looked up the amino acids that corresponded to the FS (frameshift suppressor) tRNAs for future use:
        1. CUAGU = Leu
        2. CCCUC = Pro
        3. CGGUC = Arg
        4. CCACU = Pro
        5. CCAUC* = Pro
           *9 and 10 bp anticodons
Also, we have decided to use NcoI as the restriction enzyme for RFP. This cleavage site occurs 419 bp into the gene. We have decided to use BamHI as the enzyme for Tetracycline Resistance and the cleavage site occurs 290bp into the gene. Both of these enzymes are very powerful and hardy.
We also looked over Missouri Western's tRNA oligos and primer oligos which we approved. Our oligos were also approved by Missouri Western and Dr. Campbell ordered them while we supervised.
In the afternoon we did the miniprep. The mini prep directions were as appear in the link below.
http://www.bio.davidson.edu/courses/Molbio/Protocols/Zippy_MiniPrep.html
We then worked with the Nano Prep to dilute our solution of DNA to an absorption of 1.5 and then we made labels for the tubes. The chart below shows relevant information we obtained from the NanoDrop for each of the reporter plasmids.
Tuesday, June 9, 2009
Preparations for restriction enzymes digestion of plasmids
Purpose: To determine the size of the plasmid inserts and ensure that plasmids are what we extracted from the cells during the mini-prep.
Things we need:
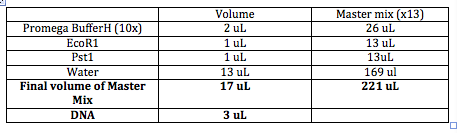
  DNA ~3uL
  Buffer 10x (Want to dilute to 1x) so add 2uL
  Enzyme 1 ~1uL
  Enzme 2 ~1uL
  Water ~13uL
  Final Volunter about 20 uL.
Need to choose the right buffer for the restriction enzymes. All buffers come in 10x (10 times more concentrated than what you want it to be when you use it). Buffer Website
Total volume of enzymes has to be 10% or less than final volume (most volume 2uL). Barely submerge the pipet tip into the solution when pipeting the enzymes. Star (*) activity: Restriction enzyme stops cutting specifically and starts cutting everywhere.
DNA can't be seen by itself so we add EtBr (the bigger the insert, the more will bind) so bigger strands appear brighter. samples.
The order of entry doesn't matter, but make sure to enter the enzymes last.
Will have lots of labeled tubes and will put 3uL of appropriate plasmids into the tubes. In the meantime, we'll make a "Master Mix" of all the other ingredients in a bigger tube. Always make enough volume for one extra tube.
Enzymes usually have an optimal temperature of 37C. We will let this reaction go for an hour and then we will run it on a gel.
Gel Electrophoresis Protocol
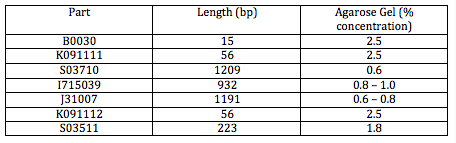
Website online for ideal gel concentration for resolving different sizes of molecules Gel Concentration Website. See protocol on the Davidson/Missouri Western Wookie for running molecules in the gel and how to digest with restriction enzymes.
What's Next?
1. 5' end additions
  a. Using PCR
  b. Cut at the restriction sites EcoR1 and either Bam H1 or Nco1
  c. Cut plasmid and reporter with same restriction enzymes as above
  d. Run a gel and purify "keeper" DNA (Ligate transform, screen, sequence)
  e. Then, we take the "keeper" DNA and combine it with the insert from part
We can have steps d and e ready in advance.
2. tRNAs
  a. Assemble the oligos into genes (Requires lots of calculations beforehand, but the actual steps )
  b. Plasmids cut up with EcoR1 and Pst1 WE CAN USE THE "WASTE" PLASMID FROM THE RESTRICTION ENZYME DIGEST
  c. Gel purify the plasmids (Ligate transform, screen, sequence)
The following tables include Master Mix measurements, agarose gel concentrations and buffers. http://gcat.davidson.edu/GcatWiki/images/0/08/Shamitapic3.png http://gcat.davidson.edu/GcatWiki/images/d/d1/Shamitapic4.png http://gcat.davidson.edu/GcatWiki/images/6/6f/Shamitapic5.png
We made the Master Mix with our DNA and put it in the incubator at 10:40 AM.
Preparing the Gels
Now, we will be making 2 gels, 1 at 0.8% and 2.5% (weight to volume percent). The gel volume is 60mL.
  Definition of 1% solution:
  1 gram of agarose/ 100mL buffer
So for a 0.8% solution: 0.8 grams agarose/100mL buffer AND we need 60mL (fixed volume for casts run) so multiply that by 0.6. Final concentration:
.48 grams agarose/60mL buffer
1 uL of EtBr stock for 60mL of gel. EtBr is in the buffer so it is constantly replenishing itself even though it is moving toward one end in order to make bands on the other end visible.
After Dr. Campbell's demonstration, we each helped prepare a 0.8% buffer solution using the agarose powder, buffer and EtBr. We mixed together the first two substances in a 200mL Erlenmeyer flask and heated it for 120 seconds in the microwave. We then added EtBr and poured the gel solution into the gel cast.
Agar Plate
After lunch, we grew some more cells for each of the 11 parts in an agar plate labeled "LBAMP-AMC-9 June" so that so would have extra cells that could be stored for up to 2 weeks. We made small circles on the agar plate and numbered them 1-11. The numbers corresponded to the following parts. We put the plate in the incubator overnight to let the cells grow.
   1. B0030 AMC
   2. K091111
   3. S03710
   4. I715039 OEH
   5. S03511 ORH
   6. I715039 AST
   7. B0030 SDP
   8. K091112
   9. J31007 LJH
   10. J31007 REC
   11. S03511
Unloading the Gels
The following shows which parts we entered in which gels:
We unloaded the 2.5% agarose first and after observing the bands under a UV light, put the gel into the BioRad machine to observe the bands. The image below is of a Molecular Weight Marker that shows the number of bp in control fragments of DNA according to the distance they travel down the gel.
We obtained the following printout for the first gel that was 2.5% Agarose.
The bands in the first well at the bottom are those of the molecular weight marker. We skipped the lane above (to the right) of the MWM and entered the rest of the inserts as described in the above table. A light band is visible for each of the 4 other wells. In Lanes 3 and 4 we concluded we are supposed to have approximately 45 bp because the insert is 15bp + 30 bp on either side of the insert (Xba1 and Spe1 restrictions sites + sticky ends + extra bases). We used the same logic for Lanes 5 and 6 which are supposed to contain approximately 86 base pairs.
One discrepancy in this gel, however, is that Lanes 5 and 6, which according to their labels respectively contain the LacIQ promoter and the Lac IQ1 promoter. According to the information online at the parts registry website, pLacIQ1 should be the same length as pLacIQ. The gels do not show this, but instead show that the sample in Lane 5 is smaller than that in Lane 6 because Lane 5 traveled further. Leland Taylor and Romina Clemente sent out an email to Pallavi Penumetcha to ask about this because she had written a paper about this.
We then unloaded the 0.8% agarose gel and then placed this in the BioRad machine under the same protocol as above. The following image is the 0.8% Agarose.
We observed that the bands in Lane 1 (which is now at the top) are examples of high intensity bands. The plasmids contained in the original well are twice the intensity of the insert.
In Lane 5, however, we observed several different bands. This could be due to the extra DNA that was sitting on the top of the well. We decided to re-expose the gel to get better observations on Lanes 3 and 4 because the bands were not as intense. We anticipated seeing a band at about 250 bp because this was the size of the insert (plus extra bp). After re-exposing the gel, we did not find any difference and still did not see any bands in these lanes. We have decided to redo the gel on the part S03511 and so we prepared the master mix with that DNA and incubated it so that we could run the gel tomorrow.
We also cut out the "empty" plasmids from the gel so that we could use this as vectors for the coding sequence of the suppressor tRNAs.
Tomorrow we will be planning out specific tasks for people once the oligos arrive.
Wednesday, June 10, 2009
We began this morning by making the agarose gel with the same protocol as yesterday. This time, since we are just re-doing both S03511 inserts, we will have a 1.8% agarose gel.
OUTLINE: WHERE DO WE STAND?
  Yesterday
   a. Isolated empty plasmids
   b. Verified most inserts
   c. Waiting for:
      >tRNA oligos
      >Primers
         a. Will amplify the reporter gene in the plasmid itself

  Next?
   a. When Primers Arrive
      > Amplify the reporter genes with primers (PCR takes ~3 hours)
      > Calculate how much reporter plasmid we will need (Start with 50x more than we actually will need)
      > Cut amplified sequence (EcoR1 and BamH1/Nco1) then purify what we need
      > Cut reporter plasmid  (EcoR1 and BamH1/Nco1) then purify what we need
      > Ligate amplified sequence and reporter plasmid
   b. When tRNA oligos arrive
      > Calculate how much of each oligo we will need (takes a while...)
      > "Boil and cool" tRNA oligos together
      > Ligate fragments (dsDNA) into plasmids we isolated yesterday (~5 minutes)
      > Transform the plasmids (~20 minutes)
- LOOK THROUGH LIGATION PROTOCOL (How to assemble genes)
- LOOK THROUGH TRANSFORMATION PROTOCOL
  What we need to get done today:
     1. Prepare the control for the Tet Resistance by BioBricking the part pLac+RBS (S03511) with the TetA (J31007).
     2. Check the part number for RFP and also for pLac+RBS+RFP
     3. Read through ligation protocol
     4. See how many nanograms of plasmid we will need for the tRNAs and for the inserts and multiply this number by 50.
        > Check if we have enough plasmids from our mini-prep
     5. Purify the plasmids from the gel
After we made this outline, Leland, Olivia and I analyzed the gel we ran this morning and did not see a more than one band in the 2 lanes that contained DNA from S03511 (image below). Since we did not see multiple bands in yesterday's gel either, we conclude that there is something wrong with the DNA rather than with the restriction enzymes that we used to cut it. We concluded that there is probably not an insert in this plasmid both the part and the plasmid are useless.
Now, we do not have an immediately accessible promoter. We have decided to order the pBAD promoter from Missouri Western and we will attach the RBS+Tet to this plasmid. Our insert for this will be the larger gene because it is easier to manipulate in the gel than the small gene.
Alyndria Thompson and Romina Clemente are figuring out the size of the plasmids including the reporter genes.
After lunch we performed several steps to isolate and purify the gel to get the empty plasmids will be the vectors for the tRNA DNA. Then, we used the NanoDrop to assess the purity of our DNA. We found that the plasmids were more pure than we had expected. The following values were obtained:
  Abs 1.850
  A-260 10 mm path 0.172
  A-280 10 mm path 0.075
  260/280 2.28
  260/230 0.09
We then followed the protocol for preparing the agar plates. We put the plate with the agar solution in the Autoclave.
While the solution was in the autoclave, we discussed that we don't really need a promoter in front of RBS+Tet for the gene to be expressed because Tet expression is so strong that the gene would translate without a promoter. However, it would be a good idea to have the promoter because if it was possible to reinforce the translation of the reporter protein, we wanted to do that.
We found that there were some tubes in the lab fridge that contained the pBAD and pLac promoters with RBS. We decided to use these as the promoter and RBS for our experiments. The pLac promoter will be used for RFP and the pBad promoter used with Tet Resistance. We decided to use the pBad with Tet because it is weaker in comparison to pLac. As expression of the Tet gene can be toxic to a cell, we do not want to overexpress the gene with a stronger promoter.
Once the agar solution was sterilized in the Autoclave, we removed it, cooled it, and pipetted the antibiotic resistance into it. We then poured the solution into the plates, removed any bubbles, and let the gel form.
Alyndria Thompson and Romina Clemente concluded that we had more than enough recieving vectors for both the RFP and Tetracycline genes. Since we need 50 nanograms, it is wise to have at least 50 times that much that we can work with, so we need at least 2,500 ng.
  RFP 1: 77.6 x 4 = 310.4 ng/uL
                    x     20 uL = 3,272 ng
  RFP 2: 59.5 x 4 = 238 ng/uL
                    x     20 uL = 4,760 ng
  Tet: 40.9 x 4 = 163.6 ng/uL
                    x     20 uL = 3,272 ng
According to these calculations we have more than 50 times what we need for both instances of RFP and Tet.
Tomorrow, we can prepare the Master Mix for the digestions of both reporter plamids and then add the restriction enzymes once they arrive. Then, we can follow through with the rest of the plans we had made above in the section titles "Next?".
Thursday, June 11, 2009
We began this morning by calculating how many uL we would need for each of the mixes for digesting our reporter plasmids. We decided to double the final volume of each mix to 40uL instead of 20uL. Since we knew the concentration of each plasmid and also knew we needed 2500 ng, we cross multiplied to find the uL of DNA we would need for each.
  Concentration Calculations:
  310.4 ng/1 uL = 2500ng/x uL
  x = 8.05 uL
Here is a chart indicating how much of each we used for the 2 mixes.
On the Promega website, we found a list of compatible buffers for double digestions. Buffers E and H are compatible for the Tet plasmid and RFP plasmid digestions respectively. We fortunately have both buffers in stock.
We waited for our waited for the restriction enzymes to arrive and in the meantime, we transformed the plasmids with pLac+RBS, pBad, and pBad+RBS into E.coli cells. We want the E.coli cells to replicate the plasmids with these genes because we have a limited amount of genes. Zippy Plasmid Transformation
Once our oligos and restriction enzymes arrived, we got to work right away!
PCR (Polymerase Chain Reaction)
We calculated how much plasmid we will need for the PCR. We decided to dilute the concentration of our plasmids a hundred fold so that we could get pipetable amounts.
  Change in Concentrations
  310.4 ng/uL x 1/100 (dilution factor) = 3.104 ng/uL (RFP)
  163.6 ng/uL x 1/100 (dilution factor) = 0.164 ng/uL (Tet)
  Example shown with RFP
  3.104 ng/1 uL = 1ng/ x uL, x = .32
  For Tet, x = .61
We also calculated how much of each primer we would need with the following equation:
  C1V1 = C2V2
  (100 uM) (x) = (1 uM)( 100 uL)
  x = 1 uL
Each of the 5 of us made had 2 tubes (one for each reporter protein) because there were 5 different forward primers.To each tube, we added the template DNA (either RFP or Tet), water, the respective reverse primer (either RFP or Tet), and the forward primer depending on which 5mer we had chosen. My 5mer was CCAUC. Finally, we added the Master Mix last because this contained the enzyme (DNA polymerase) that would amplify our desired sequence.
I had CCAUC as 5mer.
We followed the temperature cycles so that PCR could occur. The annealing temperature needed to be 5C less than the smallest melting temperature of the primers. Since the reverse primer of RFP had a melting temp of 66C, we set the temperature of the 3rd cycle on 61C.
tRNA Oligo Assembly
We needed to calculate the concentration of each of the oligo before carrying out the assembly. The stock concentration of each of the oligo was 100 uM. Since we wanted to have 5uM of the oligo in the test tube, and we know that final volume of the test tube is 20 uL, we just cross multiplied to find the amount we needed to add to the tubes to get this concentration.
  (100uM)x = (5uM)(20uL)
  x = 1 uL
We added 1 uL of each oligo to the tubes.
We had six total tRNAs we needed to assemble so each of us took one FML (one person took two) and to each tube we added 1uL of each oligo for a total of 7uL, 2uL of buffer, and 11uL of water for a total volume of 20 uL. Five of the oligos were constant and 2 varied for each of the different tRNAs. So everyone pipetted the same 5 oligos and everyone also had 2 unique oligos to add. When all of the oligos were added and the tubes ready, we boiled the tubes at 50C for 5 minutes. We then allowed the tubes to remain in the water to cool very slowly overnight so that the annealing process could take place.
The last thing we did at the end of the day was finish off our plasmid digestion that we had begun in the morning. We added the buffer, DNA, water, and restriction enzymes and placed this in the incubator for overnight digestion.
To Do:
 1. Isolate our desired dsDNA from the PCR.
 2. Verify our tRNA inserts and eventually transform these into plasmids.
 3. Check our agar plates to see colonies that have replicated our pLac+RBS, pBAD+RBS, and pBAD genes.
Friday, June 12, 2009
This morning, we began by outlining the main items on today's agenda.
 1. tRNAs: Ligation, Transformation
 2. Digestion reporters (run all of it and gel purify)
 3. Transformed cells
 4. PCR: Gel run an aliquot to verify (5uL)
We used the equation given by the Ligation protocol to calculate how many nanograms of insert we would need. Initially, we started out calculated the MW average of the 9 and 10 anticodon loops of tRNAs which were 15828.23 ug/umols and 159016.6 ug/umols respectively. We then saw, however, that these would not be helpful values in the process. Instead we started out with the equation below to find the final ng of insert we would need for the ligation.
We calculated our initial concentration in ng/uL of insert as shown below.
 X nanograms of insert = [(2)(144bp)(50 ng linearalized plasmid)]/2038bp
  X = 7.0657 ng of insert
We wanted to find the amount of uL of insert we would need to use. We diluted the initial concentration 50x because we wanted a pipettable amount of insert. Since we knew we wanted the final amount of nanograms to be 7.0657, we calculated as shown below:
    DILUTION: 555.48/50 = 11.012
    CALCULATION: 11.012 ng/ 1uL = 7.065 ng/ x uL
                                   x = .64 uL of insert
After we had done these calculations, half of the group started to carryout the ligation of the tRNA inserts into empty plasmids. We needed 7 ligations total: 6 were the tRNAs we needed, while the last one is a negative control. These are the final amounts of what we used:
The other half of the group (which included me) prepared the agarose gels so that we could run gels for the digested reporters and the PCR inserts. We calculated that the digested reporters needed an agarose of 0.4% and the PCR reporters needed an agarose of 1.45%. We allowed this gel to form for about 45 minutes to an hour. We prepared both the gels and allowed them to run through lunch.
After lunch, we took pictures of our gels and noticed that the third lane in the PCR gel (third lane from the top in the bottom photo) did not develop a band. The lane was supposed to contain the CUAGU insert for Tetracycline Resistance.
Romina Clemente and I decided to repeat this PCR using the TetResistance and RBS+TetResistance plasmids as templates. We labeled J31007 as "2*" and S03710 as "2!". We had to recalculate how much template DNA to use. We let the PCR run overnight. We also verified that the digestion fragments (both the plasmid and the insert) on the other gel were the correct size. The plasmids, which are the brighter fragment in the gel with only 2 lanes, contain the plasmid base pairs along with the rest of our reporter genes. We isolated these plasmids from the gel today and stored them for purification on Monday.
In the meantime, other members of our lab had finished the ligation of the tRNA genes to the empty plasmids and were now transforming these into competent cells. They placed the agar plate with these cells in the fridge overnight.
We also observed the transformations that we had performed yesterday and noticed that I13453 did not form any colonies. J04500 and J3102 did form colonies.
   To Do:
   1. PCR: Dig, Ligate, Transform
                 Clean and concentration column, digest, clean and concentration column, ligate.
   2. Gel purification of our digestion plasmids
   3. Check if colonies have grown for our tRNAs
Saturday, June 13, 2009
Alyndria Thompson came in on Saturday morning to remove the tRNA plates and put the PCR reactions in the fridge.
tRNA Colonies
She counted the colonies of tRNA on each plate.
She placed the plates in the large fridge on the top shelf at 9:23 am. She talked to Dr. Campbell who said we will have to try to "work them up".
PCR
Products were placed in orange rack of smaller fridge. [2*, 2!]
Sunday, June 14, 2009
Second Ligation and Transformation of tRNA inserts
We decided to re-ligate and re-transform all of the tRNA inserts because we did not get very good yields of colonies from the transformations. We are using the same measurements for this ligation as we had used on Friday.
After ligation, we transformed the cells. Using the following measurements, we transferred the competent cells into new tubes.
  40uL of competent cells
  10uL of ligation mixture
  60uL of LB media
After spreading the mixture onto the agar plates, we incubated the plates at 10:56 pm.
We also stored liquid cultures of the colonies that greater than a 2:1 variable:negative control ratio just in case we wanted to use them for mini preps in the future. These included #1 (3 samples), #4 (2 samples), #5 (1 sample), and #6 (2 samples).
  To Do:
  1. Count colonies obtained from second transformation
  2. Clean PCRs: Dig, ligate, transform
  3. Run gel for 2 Tet PCRs, clean
  4. Gel purify receiving vector